Saturday, March 31, 2018

Cloning Fresh dpkg antar mesin


Pernah kepikiran ngga, gimana caranya install di mesin B SAMA PERSIS seperti yang terinstall di mesin A ????

gini caranya :
di mesin A ketikkan :
dpkg --get-selections > selections.txt
perintah diatas maksudnya mencatat apa saja dependensi yang terinstall pada mesin A ke file selections.txt kemudian pindahkan file selections.txt tadi ke mesin B.

kemudian pada mesin B :
  • install dselect
apt-get install dselect
  • kemudian men-set dselect agar menginstall apa saja yang telah tercatat di selections.txt
dpkg --set-selections < selections.txt
 dselect install

dan, selesai :D gampang kan.

Audio Sound Over TCP IP


Download jessie raspberry:
https://downloads.raspberrypi.org/raspbian_lite/images/raspbian_lite-2017-07-05/2017-07-05-raspbian-jessie-lite.zip

install package di masing masing mesin TX maupun RX
apt-get update
apt-get dist-upgrade
apt-get install git python-gst0.10 python-redis \
gstreamer0.10-plugins-base gstreamer0.10-plugins-bad \
gstreamer0.10-plugins-good gstreamer0.10-plugins-ugly \
gstreamer0.10-tools python-gobject python-gobject-2 gstreamer0.10-alsa python-setuptools lsof -y

# optional
apt-get install pulseaudio alsa-base

apt-get install redis-server
sed -i.bak 's/bind 127.*/bind 0.0.0.0/' /etc/redis/redis.conf

/etc/init.d/redis-server restart
test antar mesin dengan cara :
redis-cli -h [iplawan] ping
jika reply = PONG berarti redis-server sukses!
kemudian :
easy_install OpenOB

untuk transmitter :
- HARUS ADA USB SOUNDCARD sebagai input audio
nano /usr/share/alsa/alsa.conf
ubah nilai 0 menjadi 1

defaults.ctl.card 1
defaults.pcm.card 1

kemudian start sisi TRANSMIT
/usr/local/bin/openob 192.168.127.2 ngadirojo test-link tx 192.168.127.2
#### START SCRIPT
port=3000
server=10.10.1.66
while ! lsof -i @"$port"
do
        echo -e "\e[38;5;198mPORT : $port is down,    - start STL\e[0m"
        /usr/local/bin/openob "$server" rahox test-link tx "$server"
done
#### END SCRIPT


sisi RECEIVE
/usr/local/bin/openob [ip-receiver] test-rx-node test-link rx
#### START SCRIPT
port=3000
server=$(ip route get 8.8.8.8 | awk 'NR==1 {print $NF}')
while ! lsof -i:"$port"
do
        echo -e "\e[38;5;198mPORT : $port is down,    - start STL\e[0m"
        /usr/local/bin/openob "$server" test-rx-node test-link rx
done
#### END SCRIPT

trobelshoot :
lsof|grep "\([0-9]\{1,3\}\.\)\{3\}[0-9]\{1,3\}" | grep openob
usage: openob config_host node_name link_name tx [-h] [-a {auto,alsa,jack}]
                                                 [-d ALSA_DEVICE]
                                                 [-jn JACK_NAME] [-aj]
                                                 [-r SAMPLERATE]
                                                 [-e {pcm,opus}] [-p PORT]
                                                 [-m] [--no-multicast]
                                                 [-j JITTER_BUFFER]
                                                 [-b {16,24,32,48,64,96,128,192,256,384}]
                                                 [-l LOSS] [--dtx] [--no-dtx]
                                                 [--fec] [--no-fec]
                                                 [--complexity {0,1,2,3,4,5,6,7,8,9}]
                                                 [--framesize {2,5,10,20,40,60}]
                                                 receiver_host

positional arguments:
  receiver_host         The receiver for this transmitter. The machine at this
                        address must be running an rx-mode Manager for this
                        link name

optional arguments:
  -h, --help            show this help message and exit
  -a {auto,alsa,jack}, --audio_input {auto,alsa,jack}
                        The audio source type for this end of the link
                        (default: auto)
  -r SAMPLERATE, --samplerate SAMPLERATE
                        Set the sample rate to request from the input (Hz)
                        (default: 0)
  -e {pcm,opus}, --encoding {pcm,opus}
                        The audio encoding type for this link; PCM for linear
                        audio (16-bit), or Opus for encoded audio (default:
                        opus)
  -p PORT, --port PORT  The base port to use for audio transport. This port
                        must be accessible on the receiving host (default:
                        3000)
  -m, --multicast       Start this transmitter in multicast mode, enabling
                        multiple clients to connect at once using the address
                        specified in reciever_host (default: False)
  --no-multicast        Start this transmitter in unicast mode (default)
                        (default: False)
  -j JITTER_BUFFER, --jitter_buffer JITTER_BUFFER
                        The size of the jitter buffer in milliseconds. Affects
                        latency; may be reduced to 5-10ms on fast reliable
                        networks, or increased for poor networks like 3G
                        (default: 40)

alsa:
  Options when using ALSA source type

  -d ALSA_DEVICE, --alsa_device ALSA_DEVICE
                        The ALSA device to connect to for input (default:
                        hw:0)

jack:
  Options when using JACK source type

  -jn JACK_NAME, --jack_name JACK_NAME
                        JACK port name root (default: openob)
  -aj, --jack_auto      Disable auto connection for JACK inputs (default:
                        True)

opus:
  Opus encoder options

  -b {16,24,32,48,64,96,128,192,256,384}, --bitrate {16,24,32,48,64,96,128,192,256,384}
                        Bitrate if using CELT/Opus (in kbit/s) (default: 128)
  -l LOSS, --loss LOSS  Expected packet loss percentage for Opus, between 0
                        and 100 (default: 0)
  --dtx                 Enable Opus Discontinuous Transmission support
                        (default: False)
  --no-dtx              Disable Opus Discontinuous Transmission support
                        (default) (default: False)
  --fec                 Enable Opus Inband Forward Error Correction support
                        (default) (default: True)
  --no-fec              Disable Opus Inband Forward Error Correction support
                        (default: True)
  --complexity {0,1,2,3,4,5,6,7,8,9}
                        Opus Computational Complexity, between 0 and 10 -
                        reduce on CPU-constrained devices (default: 9)
  --framesize {2,5,10,20,40,60}
                        Opus frame size (ms) (default: 20)


Thursday, March 29, 2018

API Telegram ssh


Pernahkah anda berfikiran ingin memantau siapa saja yang login dan mendapat laporan ketika ada user yang masuk ke box Anda ? api telegram solusinya.
Baiklah, pertama tama simak script berikut ini

# simpan file ke /etc/profile.d/
USERID="213567634"
KEY="930289293:AAGn69QpFJKdlwkaJDLWADkladwa"
TIMEOUT="10"
URL="https://api.telegram.org/bot$KEY/sendMessage"
DATE_EXEC="$(date "+%d %b %Y %H:%M")"
TMPFILE='/tmp/ipinfo-$DATE_EXEC.txt'
if [ -n "$SSH_CLIENT" ]; then
        IP=$(echo $SSH_CLIENT | awk '{print $1}')
        PORT=$(echo $SSH_CLIENT | awk '{print $3}')
        HOSTNAME=$(hostname -f)
        IPADDR=$(hostname -I | awk '{print $1}')
        curl http://ipinfo.io/$IP -s -o $TMPFILE
        CITY=$(cat $TMPFILE | jq '.city' | sed 's/"//g')
        REGION=$(cat $TMPFILE | jq '.region' | sed 's/"//g')
        COUNTRY=$(cat $TMPFILE | jq '.country' | sed 's/"//g')
        ORG=$(cat $TMPFILE | jq '.org' | sed 's/"//g')
        TEXT="<b>SSH Login!</b>%0A<b>pada:</b> <code>$DATE_EXEC</code>%0A<b>user:</b> ${USER} %0A<b>on hostname:</b> <code>$HOSTNAME</code>%0A<b>ip:</b> (<code>$IPADDR</code>)%0A<b>from:</b> <code>$IP</code>%0A- $ORG, %0A- $CITY, %0A- $REGION, %0A- $COUNTRY <i>%0Aon port:</i> $PORT"
        curl -s --max-time $TIMEOUT -d "chat_id=$USERID&parse_mode=HTML&disable_web_page_preview=1&text=$TEXT" $URL > /dev/null
        rm $TMPFILE
fi

ubah yang saya beri tanda merah dan sesuaikan dengan bot id telegram anda.
kemudian install jq

root@dns:/var/www/html/bot # apt-get install jq
Reading package lists... Done
Building dependency tree
Reading state information... Done
The following additional packages will be installed:
  libjq1 libonig4
The following NEW packages will be installed:
  jq libjq1 libonig4
0 upgraded, 3 newly installed, 0 to remove and 58 not upgraded.
Need to get 305 kB of archives.
After this operation, 964 kB of additional disk space will be used.
Do you want to continue? [Y/n]
Get:1 http://mirror.rise.ph/raspbian/raspbian stretch/main armhf libonig4 armhf 6.1.3-2 [127 kB]
Get:2 http://mirror.rise.ph/raspbian/raspbian stretch/main armhf libjq1 armhf 1.5+dfsg-1.3 [119 kB]
Get:3 http://mirror.rise.ph/raspbian/raspbian stretch/main armhf jq armhf 1.5+dfsg-1.3 [58.9 kB]
Fetched 305 kB in 1s (161 kB/s)
Selecting previously unselected package libonig4:armhf.
(Reading database ... 45136 files and directories currently installed.)
Preparing to unpack .../libonig4_6.1.3-2_armhf.deb ...
Unpacking libonig4:armhf (6.1.3-2) ...
Selecting previously unselected package libjq1:armhf.
Preparing to unpack .../libjq1_1.5+dfsg-1.3_armhf.deb ...
Unpacking libjq1:armhf (1.5+dfsg-1.3) ...
Selecting previously unselected package jq.
Preparing to unpack .../jq_1.5+dfsg-1.3_armhf.deb ...
Unpacking jq (1.5+dfsg-1.3) ...
Setting up libonig4:armhf (6.1.3-2) ...
Setting up libjq1:armhf (1.5+dfsg-1.3) ...
Processing triggers for libc-bin (2.24-11+deb9u1) ...
Processing triggers for man-db (2.7.6.1-2) ...
Setting up jq (1.5+dfsg-1.3) ...

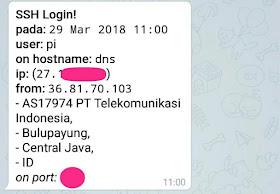
Coba anda login ke ssh Anda, (coba dari luar network) nanti hasilnya seperti ini di telegram anda.
Jika login dengan ip private nanti pesan balasannya null, null, null, tapi status login tetap diterima.


Wednesday, March 28, 2018

Queue Otomatis DHCP Mikrotik

Kali ini saya akan share tips cara menambahkan simple queue untuk melimit device yang terkoneksi ke mikrotik routerboard melalui dhcp service. Konsepnya, setiap kali device yang mendapatkan ip dari dhcp server mikrotik akan dibuat queue secara otomatis. Syaratnya harus menggunakan mikrotik routeros versi 6.xx. Baiklah ini scriptnya.

#add parent
:local parent [/queue simple find name=ROOT]
:local network "172.16.0.0/12,192.168.0.0/16"
#tambahkan parent jika belum ada
:if ([:len $parent] = 0) do={/queue simple add name=ROOT max-limit=10000k/10000k target="$network" packet-marks=no-mark}
#action
:local queueName "Client-$leaseActMAC";
:if ($leaseBound = "1") do={
/queue simple add name=$queueName target=($leaseActIP . "/32") limit-at=1000k/1000k max-limit=2000k/2000k burst-limit=3000k/3000k burst-threshold=2000k/2000k burst-time=8/8 parent=ROOT packet-marks=no-mark comment=[/ip dhcp-server lease get [find where active-mac-address=$leaseActMAC && active-address=$leaseActIP] host-name];
} else={
/queue simple remove $queueName
}

yang berwarna merah silahkan sesuaikan. Tambahkan script itu pada menu ip => dhcp-server pada textbox lease-script.
Semoga membantu.